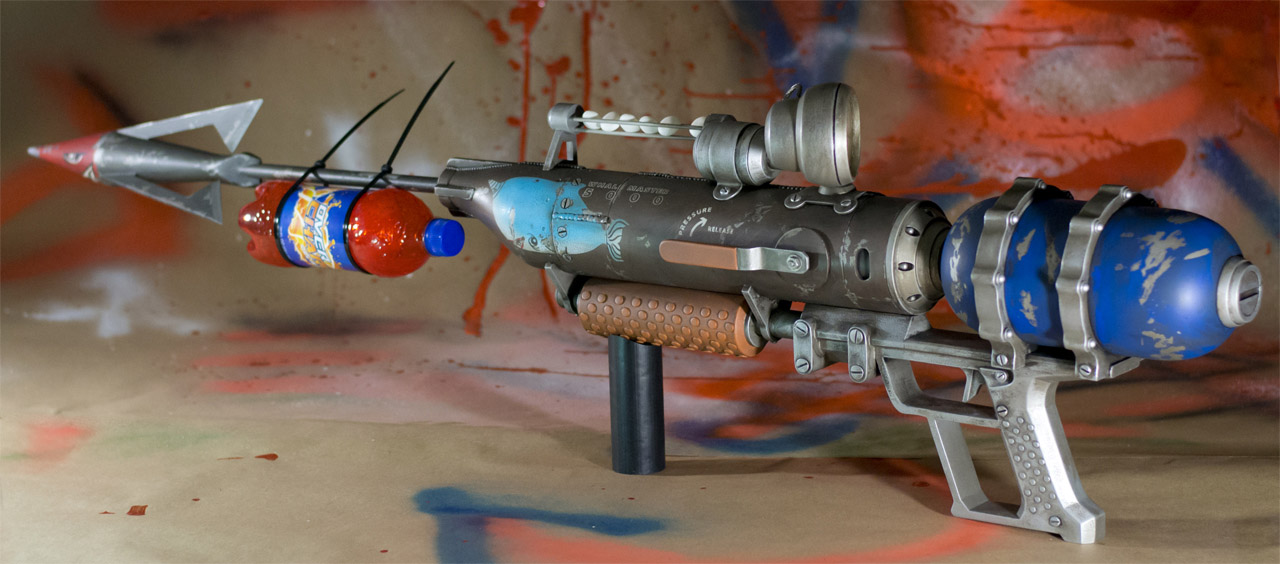
Captain Ahab, Sunset Overdrive
Back in June I got an invite from my buddy Frank Ippolito to fly out to LA and visit E3. As I’m someone who has a passing interest in video games, I bought a plane ticket immediately. E3 was a great time, and I spent a lot of my hours on the floor walking from booth to booth, annoying the people working there by asking if they had any interest in hiring me to make props for them. Schmoozing isn’t my forté; I spend most of my time alone in a large concrete hallway filled with paint fumes. Some companies were great about letting me chat with developers about potential projects (hey Bungie and Bioware!) while others had information kiosks staffed with stern-faced gatekeepers tasked with keeping the important people far away from the unwashed ground-level attendees (looking at you here, 2K.)
One of the companies I harassed most fervently were the fine folks at Insomniac Games, and by matter of proximity, most of the people at Microsoft. The Sunset Overdrive booth was packed throughout the entire convention and I stopped by every few hours to chat with anyone who would give me a few minutes. This eventually led me to a twitter conversation with the Senior Community Manager at Insomniac, who said they’d been looking at having props made but hadn’t picked an artist yet. BAM!
This is how I ended up getting a phone call about 5 weeks later asking for two very detailed replicas from the Sunset Overdrive universe to debut at PAX 2014. I had three weeks, so I partnered up with another local prop shop – Hex Mortis – to make it happen. The first build – the Captain Ahab – is an air powered spear gun with a harpoon tethered to a bottle of Over Charge Delirium XT. There’s also a rail filled with Mentos on the top of the gun. The idea is to load up the mint before firing, turning the harpoon into an explosive round. Like everything in Sunset Overdrive it’s huge, gaudy, and way over the top.

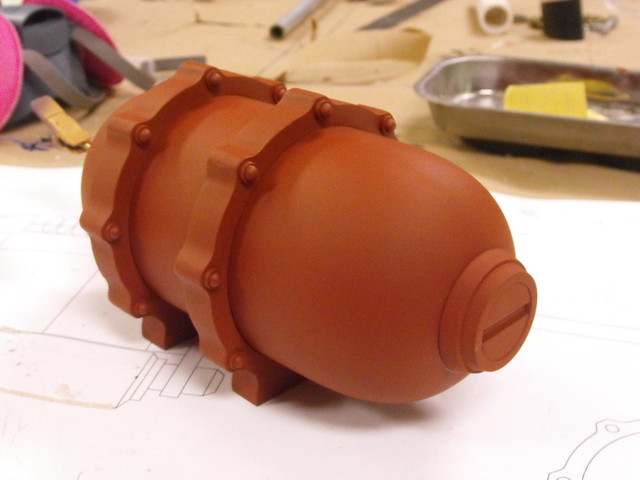
I started the build on the lathe, turning the parts for the large rear pressure canister out of high density tooling foam. This was vacuumformed in white styrene to make a rigid shell.


This rear tank has a couple little fittings on it front and rear, which were also turned from urethane foam. These were much higher density since it would be used on the final prop. No time to make molds!


Acrylic trim rings were laser cut and slipped over the tank to simulate the pressure/mounting bands. My laser cutter can only cut .220″ plastic, so each piece was trimmed three times then glued together to make thicker parts.

There are a lot of faux rivets scattered around these components. For the trim rings, I glued metal washers onto plastic BB pellets then sanded the back side flush to make the studs seen below. On the larger tank flange, I used the tops of electrical crimp connectors.

For most of the rest of the gun assembly, I scoured the “tube and pipe” sections of McMaster-Carr looking for proper diameter stock. The main barrel chamber is acrylic tube, while the harpoon shaft is fiberglass rod. The lower grip section is PVC with a smaller PVC pipe used as the support rod. Real hardware was added in certain parts to give the plastic tubes a bit more believability.

More high density foam was used to turn the harpoon tip. As it’s pretty easy to dent this stuff on its own, I painted a layer of epoxy resin onto the surface of the tip before adding the fins/hooks. These hooks were made from acrylic, though in retrospect something a little less brittle – like ABS – might have been a better idea in the interest of durability.


The lower grip needed several dozen small raised dots on its surface, which I marked out by making a drill jig out of a piece of styrene. This was a flat shape with a bunch of holes in it that was taped around the pipe. I used a drill to bore out all of the surface holes, then glued rivets into each one individually. This took forever, but the result was worth it!


With the deadline being so short on this project, I was pushed a little out of my comfort zone on a few elements. Namely, 3D printing. I haven’t had the opportunity to work with filament printed parts before, but in the interest of time a few pieces were outsourced. For the Ahab, this meant the grip, forward barrel reducer, and gauge stalk.


Unfortunately there were some communication issues regarding the build scale and the parts arrived about 10% too small. I had to perform a bit of creative surgery to get things to line up. The grip was extended by about 1″ with some sintra inserts, and the barrel reducer was flared out with a generous helping of body filler.


At this point I had enough parts to make a rough, precariously-balanced mock up of the final result. This is an integral step in my process, because otherwise I’m just looking at a pile of parts and motivation can be tough to come by!

ABS 3D prints require a lot of clean up, and by the end of this sand/prime/repeat dance I was really wondering if I’d saved a lot of time after all. For more complex shapes like the High Fidelity rapid prototyping makes perfect sense, but a broad flat shape like the grip here would be easier and faster to scratchbuild. Ah, learning new techniques!


For the myriad of weld lines along the main tube, I used some 2-part acrylic cement dispensed through a narrow mixing nozzle. Just add a bunch of little blobs all in a row for instant faux welds! The smaller welds along the front fins were added with Testor’s contour putty.


The standoffs that hold the lower grip in place are more laser cut .220″ acrylic. Since the main tube is also acrylic I was able to weld these parts together with acrylic solvent, essentially making them one component. Way more secure than glue.

There were only three components left to build now: the two mint holder parts and the valve lever. If you’ve been following along so far you can probably see what happened here. More turned tooling foam, a bit more laser cut acrylic, and some sintra sheet. I made the valve lever a static piece but later found out that doesn’t matter to some people, who will try their hardest to get it to turn anyway. It snapped off the first day of PAX, and I fitted an aluminum bar for its replacement.


I did have a couple of these parts made as ABS prints, but decided the clean-up wouldn’t be worth the effort. Nothing against 3D printing, just easier to scratch build sometimes!

Time for paint! A few pieces in this shot jumped the gun, but most everything was given a fresh coat of primer before going into the spray booth.


Ahab has a pretty heavily weathered paint scheme marked by a ton of chipped finish and lots of grime. There’s a ton of surface variations, so layering was the order of the day. Parts that needed a metallic base were first painted with Rust-Oleum hammered silver enamel. In the shot below you can see a few pins sticking out of the surface; these serve as mounting pegs and make glue joints much stronger than if you’d use just adhesive alone.

The tank and pressure chamber needed to look like steel components with flaking surface paint, so chipped areas were masked off with automotive wax before proceeding to the top coat color. Anywhere you apply wax will repel paint, and the top color can be flaked off with a fingernail once the paint cures. In the photo below you can see the wax as a white gel on the surface of the part:

Here’s the same part with a coat of metallic brown paint, after the top coat has cured. The waxy areas (most visible around the flat head screws) look rough and pockmarked.

This photo shows the part after the wax and dried paint has been scraped away. You can use your fingernails for this, or a stiff nylon bristle brush. It’s important to clean off all the wax before proceeding with your paint and weathering, as it can prevent further layers of paint from curing in these same areas.


Most of the basecoating process followed a similar pattern. Simpler parts like the handle and gauge were painted in flat silver with weathering to come later.

At this point I assembled the gun to its finished state in prep for the finishing coat of weathering. Retrospectively I should have done the below stencil steps first, but ah well.

The Ahab has a lot of stencils on its surface. Labels, a decorative logo, and an obese derpy narwhal mascot. The harpoon tip is also an angry little guy I really like. The more complex stencils were laser cut from some contact paper, then airbrushed onto the surface. Double-masking the “WHALE MASTER 5000” logo took some time.


The little fat narwhals were masked off and gradient painted for their little pudgy bodies, then detail lines were hand painted for the eye, fins, mouth and horn. Before painting I also wax-masked off chipped areas to match the brown finish below the stencils. These chips were scratched away once the surface coat was fully cured.


A similar process followed for the happy little spear head. Most of this was hand painted, with the perimeter masked off in more contact paper.


Grime time. Lots of layers of grit and dirt were simulated with an airbrush and various washes of mixed browns. The Ahab is a really filthy gun.


The faux drink on the spear was made by slush casting orange-tinted Smooth Cast 325 inside a soda bottle. This created a hollow casting with trapped air bubbles that simulates the look of liquid really well without all the unnecessary weight. The label was printed to adhesive-backed vinyl.


I also had the gauge face printed to vinyl, with some weathering built into the printed file. This was adhered to a styrene disc and the pressure needle was laser cut from thick paper. A grimy clear acrylic disc finishes off the look. There’s a TON of pressure in this gun!

With weathering complete, the gun was sealed with flat acrylic clearcoat. In order to facilitate shipping, the harpoon was built with a threaded rod at the end so it can be removed for crating and shipment.

And here’s the finished result! Ahab is just under 48″ long but weighs less than four pounds thanks to the mostly hollow and urethane foam construction.

This was a really fun piece to paint and weather. It allowed me to use a lot of heavy techniques that I don’t get to use often.

There are more higher-resolution photos in the gallery, and be sure to check out my flickr for more detailed in-progress build photos.

Thanks for reading!

All of the products listed in this write up are the products that I used and can recommend. Some of them are provided as Amazon affiliate links, which help support Volpin Props.