
League of Legends NACC Trophy
Riot Games sent me an email in March. They had a new collegiate-level competition for their game League of Legends, and they were looking for a huge trophy for the winners to hoist in victory. League championships are no stranger to fantastic awards, but the North American Collegiate Championship didn’t have their own yet. I was given a little under four weeks.

The conceptual work was completed by my friend Tom, who also penned the designs for the Curse Employee and Gaming awards. We went through a few revisions before finally settling on a large elevated gem suspended aloft with three delicate spindly legs. By the time the designs were complete, I had 21 days.

I also had to make eight smaller awards.
I began with the base. This started life as a series of styrene sections with interior acrylic supports for added structure.

Sintra elements were added to the perimeter of the top, base and edges to add visual weight to the shape. Sintra machines very easily with woodworking tools.

The design for the trophy was optimized for laser cut materials as well as hand machining. Lots of bevels and straight edges, less organic curves and flowing lines. This allowed me to cut parts on one machine while a robot made other elements. Take the detailing on the upper section of the large base, for instance.

A sort of “sub base” was constructed out of a combination of hand-cut and laser cut styrene panels. Depth was added by varying the material thickness of the laser cut components.


More laser cuttery continued with the long arms designed to hold the large gem aloft. These started out as pieces of hand-cut MDF, accented with styrene panels and laser-etched runes.
(…the runes are pure gibberish…)


The large medallion at the front of the trophy base started off as a slab of MDF, with individually laser cut acrylic and styrene letters glued in place by hand. This was a painstaking and more than slightly stressful process.


Smaller elements like the gem shields and their supports were fabricated from more laser cut acrylic and styrene. Bevels were added later on by hand to give the parts more visual interest.

The last, most complex component was the huge gem that would be the centerpiece of the award. This started it’s life as a humble chunk of 5lb urethane tooling board, screwed to a stick.

I shaped the foam with a dozuki (one of my favorite saws for shaping foam) until I had a set of bevels that were visually interesting, non-symmetrical, and didn’t look too “square” from any one angle.


The fragile foam was then coated in Smooth-On’s EpoxAcoat Red. The epoxy coating allows the surface to be sanded to a smoother finish, and it also seals the foam, since urethane foam will inhibit platinum cure silicone from properly setting. At this point I was toying around with the idea of adding a few cracks in the surface of the gem, but decided against that aesthetic in the end.

The gem was sanded, filled, and this process repeated until all faces of the part were smooth and flat.


With the master components finished, it was time for moldmaking. The large gem was one of my greatest moldmaking triumphs to date. I was able to create the matrix mold jacket and have the silicone poured for the first half in one work day. The entire mold was finished and producing castings in less than 36 hours.

I have a longer entry about matrix moldmaking already written in my Curse Dragon Award blog, but the main deviation here was the use of urethane resins for the mold jacket instead of epoxy. Epoxies are stronger and far more lightweight, but have de-molding times that can be 16 hours or more. For this mold jacket I used Smooth-On’s Shell Shock and Plasti-Paste, which can be de-molded in as little as 90 minutes.


Here’s the mold jacket halves split open. Remember to wrap the mold master in plastic to protect it from clay stains.


After setting up a seam line, the mold was sealed and filled with Mold Star 30. This was allowed to cure for 6 hours before being opened up and pouring the second half. There were a few small spots of cure inhibition (a gentile breeze will cause Mold Star to cure improperly…) but overall I was very happy with my fastest matrix mold ever.


The larger base mold was a massive headache. I tried making this a block pour, but the sheer amount of silicone necessary actually broke the mold walls apart due to the pressure of the liquid rubber. This caused nearly a gallon of very expensive platinum-cure to spill onto the floor, wasting both materials and time.

By that point I didn’t have any material on hand and the deadline was looming, so I had to get creative. I scraped the bottom of the barrels in my moldmaking supplies and managed to scrounge enough Rebound 25, Smooth Sil 940 and Rebound 40 to cobble together a working brush-on mold.


Mold jacket walls were created using plywood and all of my remaining Shell Shock along with some thickened SmoothCast 320. This was not a production mold, and in fact it self-destructed after producing only a single casting, but that was all I needed.


The mold for the smaller sub-base went more smoothly, while still being odd. This was a two-part mold with a 33º seam line, split along one of the triangular edges of the part. The finished piece would eventually be cold cast with aluminum powder, and I needed to hide the seam lines as much as possible.


Other molds were more straightforward. The spindly legs holding the gem were two-part block pour molds using Mold Max 40 tin-cure rubber. A block pour like this is somewhat wasteful, but time was the more valuable resource to me during this project and speed took precedent over conservation of materials.


Another block mold was made for the large front logo medallion, using Mold Max 30. Still more were made for the gem shields and supports, these out of Mold Star 30. This blog entry is really starting to sound like a Smooth-On catalog at this point…


When it came time to do castings, fillers and dyes gave this piece it’s rich depth and color. Nearly the entire trophy is created from one resin – Smooth-On’s Smooth Cast 326. To start with, the gems required 100oz of resin per pour.
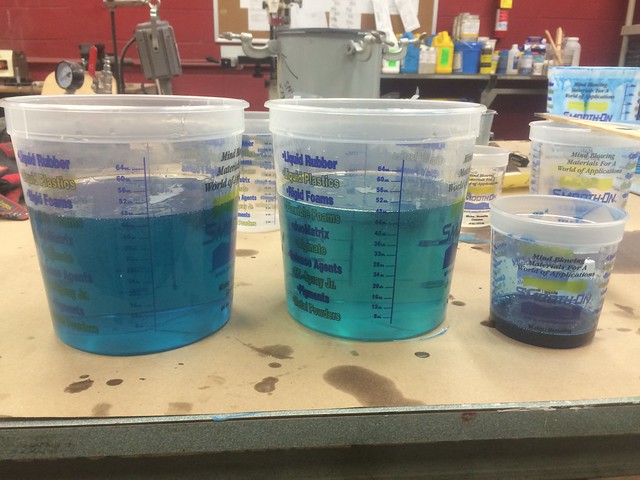
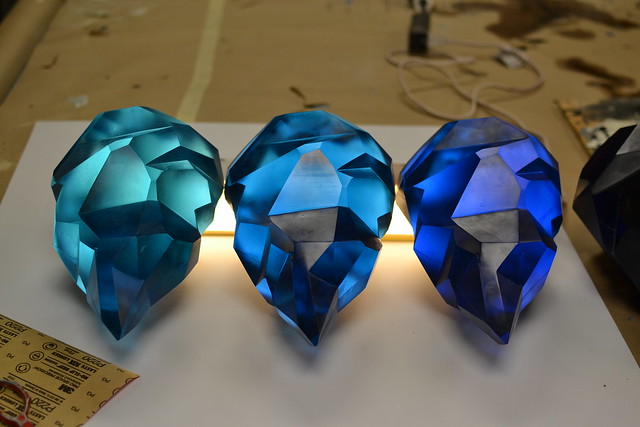
Oh, yes. Gems. Plural. I also had eight other smaller awards to make, so that gem mold got a lot of exercise. Blue dye is very, very strong and even a slight mis-measurement can change the color of a large casting very drastically. Hence, all of the gems turned out slightly different shades of blue.
Small bits of leftover blue resin were used to make the little accent gems that attach to the support legs.

Many of the other component were cold cast using aluminum powder. Cold casting is the process of dusting a mold surface with powdered metal, then pouring liquid resin into the cavity and allowing it to cure. This produces a plastic part with a thin layer of metal powder on the surface, allowing it to be polished to a shine.

The front medallion of the trophy base was cold cast, employing an old trick I’d discovered back when making Cassandra’s Pauldrons in 2010. By setting a still-curing (and therefore pliable) casting over a curved surface, simple radius bends can be made even if the mold and master parts were created as flat components. Here’s the same part before and after polishing, using aluminum wheel polish.


For the enormous base, a large styrene plug was first created to make the resin requirements of this enormous mold a little more manageable. This was set into the mold cavity before filling the void with more 325 and Quarry Tone filler. This gave the finished casting a neat granite-like appearance.


The bottom of this part wasn’t quite level, so it was bolted to my milling machine and made flat.

To add a bit of visual interest, some elements were highlighted with gold accents. For this I used House of Kolor Shimrin urethane, Zenith Gold color. A bit of gradient helped to make these elements stand out even further.


Each of the gems needed a bit of attention as well. Seam lines were sanded flush and small imperfections buffed out of the surface before each gem was treated to a gloss coat of urethane clear. The best example of these was chosen to sit atop the final trophy.


Assembly was…hurried, and as a result the documentation of that process wasn’t up to my usual standard.

Large bolts held the base to the sub-base, and the thin spires to the base assembly.


The large upper gem was held in place by a set of three pins concealed behind the small gem shields on the spire arms.

Once assembly was complete, the trophy was inserted into a set of specially cut foam inserts and cradles into a shipping crate for it’s journey to Los Angeles.


Here’s a few photos of the finished result, along with four of the eight mini-trophies (which I’ll get around to writing about eventually…)
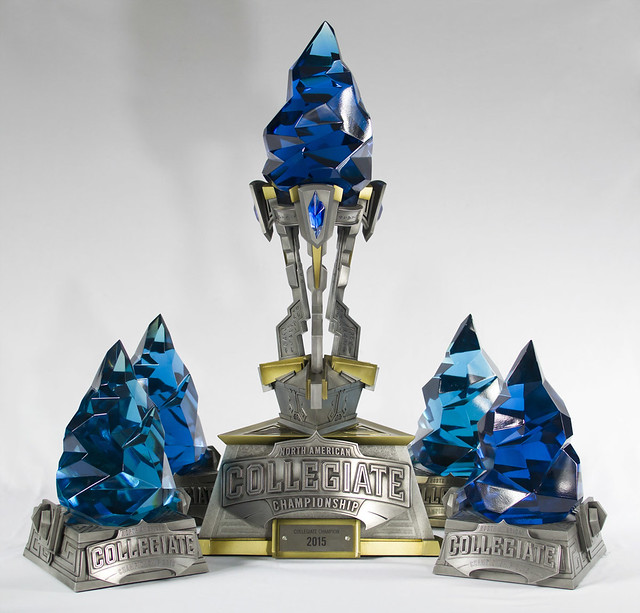
If you’re after more progress photos, be sure to check out my Flickr album on this project here.


Thanks for reading!
