The Transistor (part 1: Construction)
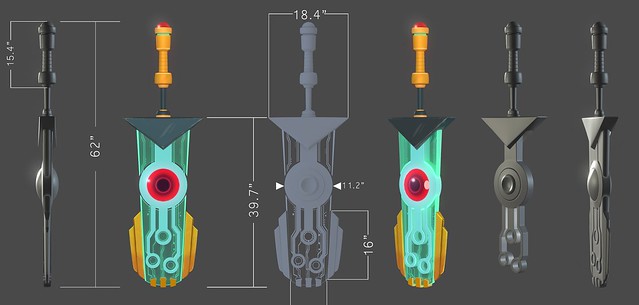
Having completed the Cael Hammer for the guys at Supergiant Games (which went over great at PAX East!) I was asked to recreate the Transistor from the similarly named game for use at their booth at PAX Prime. Much the same as the first project, new renders had to be made for this build to bring it into the real world. This would prove very useful over the course of the build.
Progress will be outlined by component rather than chronologically, so if you see some finished elements in the following shots that haven’t been covered yet, don’t worry! I’ll get to them soon.
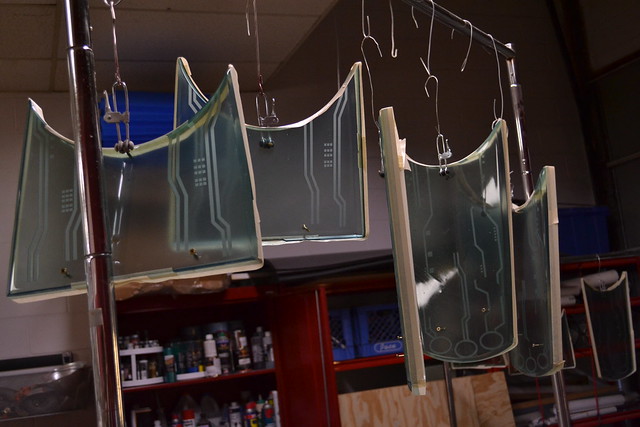
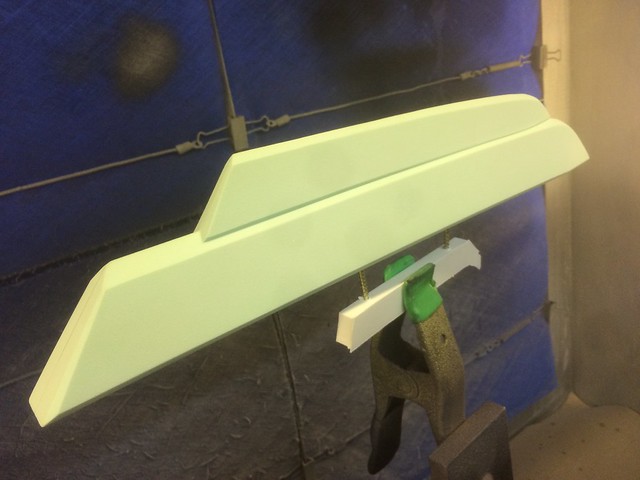
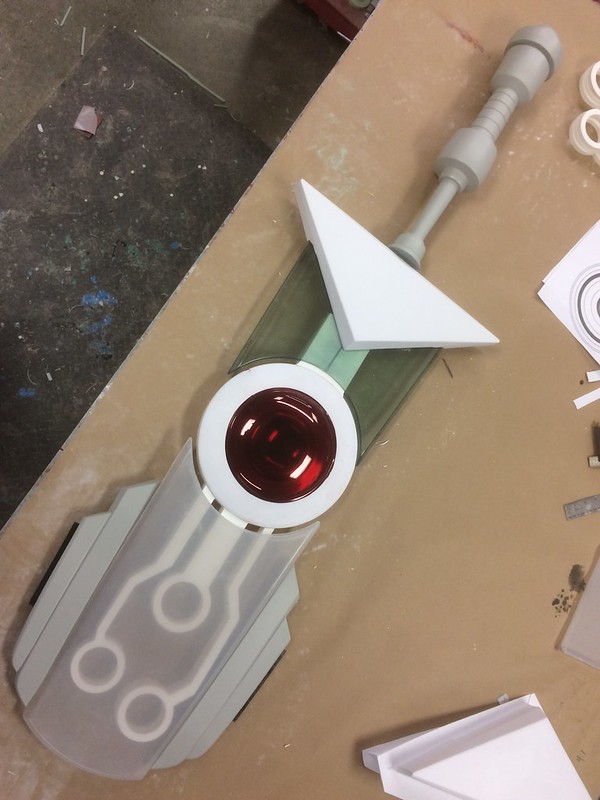
The biggest hurdle with the Transistor was that many of the components needed to be transparent. The green blade section sits around a set of circuit lines, with a large red glowing eye at the middle. Many of the other Transistor builds I’ve seen employ sheets of plexiglass in order to achieve this look, but the new renderings provided would make these sheets nearly 2.5″ thick. Way too heavy (and expensive!) for huge acrylic panels.
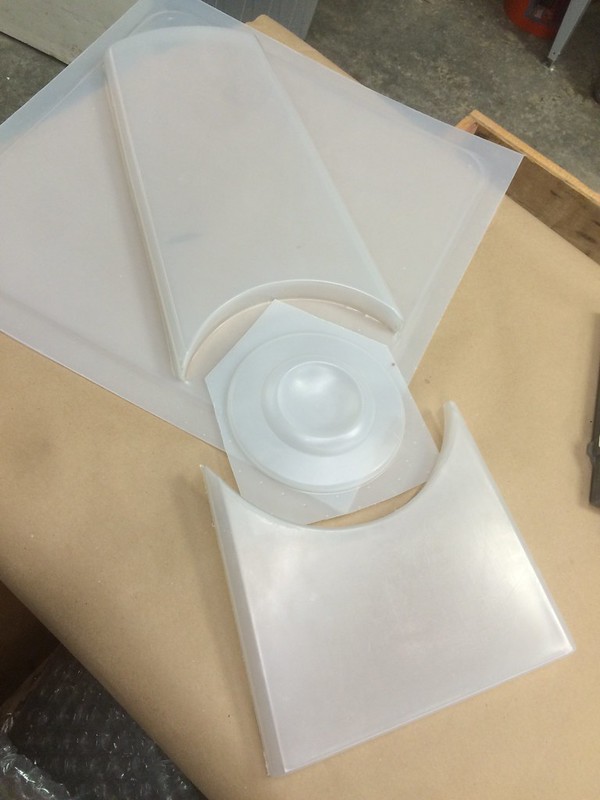
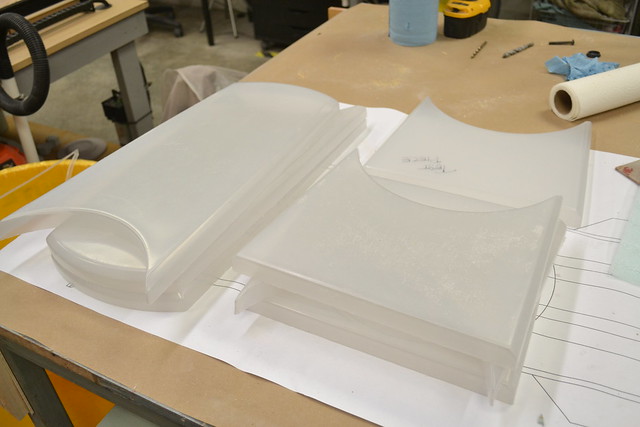
I decided to use vacuum formed PETG panels for all of the clear components. You’re probably familiar with this material from soda bottles. Its very easy to vac form and the clear sheets can be dyed to any desired color after forming.
The center eye bucks were first turned on a lathe from 31# urethane tooling board.

Since these didn’t have to be structural, they were formed out of thinner .035″ plastic. The eye has a lot of depth, so the plan was to make two sections, one set inside the other and painted with differing layers of opacity.

The larger “blade” section bucks were also made from 31# board, cut to shape with my Inventables X-Carve CnC router (more on that later) to ensure symmetry. These are pretty simple forms but they needed to be really robust to stand up to the heat of the thick plastic.
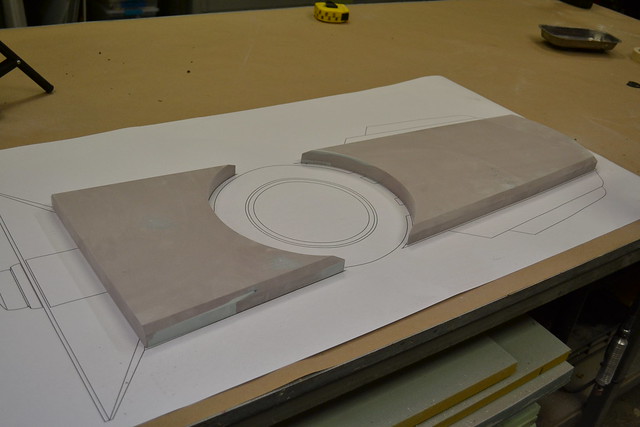
Sheets of plywood were cut on the perimeter of the base to act as a draft. Vacuum forming always leaves a soft edge along the bottom of a shape, and these drafts ensure that the actual form is lifted up high enough so that all the relevant detail is captured in the plastic.


These parts do need to be structural, so some much thicker 0.10″ PETG was used. That made the finished pulls very durable, but a massive pain to de-mold. In the end, more than a few ended up cracking under the stress.


About a year ago, a guy named Robert sent me an email about trimming one of the ear pucks on my Thomas helmet kit using a Dremel drill press to get an even cut. I finally got to use that technique when making the Transistor. Each of the blade sections needed to be precisely 1.25″ tall from the inside edge of the plastic. This would be difficult to trim out by hand while ensuring the cut stayed perfectly straight along the entire perimeter.
I made a larger work area for my drill press out of an MDF sheet, and put a rotary cutting tool into the chuck. After setting the depth with a set of calipers, each cut went by exceptionally quickly.

If you’re wondering why most of the sheets look kind of milky, it’s because PETG typically ships with a thin payer of protective plastic to prevent scratching. I’ve found that leaving this in place while vac forming cuts down on dust accumulation and makes the finished parts cleaner.
Dying PETG is, for some reason, really fun to me. There’s a lot of note-taking needed to make sure each piece turns out the exact shade of color you’re after, and each color of dye and thickness of plastic is different. I really like documentation on my projects (you could probably tell from my massive blog entries!) so this appeals to my specific nature as a maker. For the dye itself I prefer Jacquard iDye Poly.

I picked up an electric hot plate from Amazon as well as a few very large trays in order to dye the big sections of the sword. These worked great in my studio and for anyone who might be doing this repeatedly, it’s a great investment.

Things to note are temperature of the dye bath, number of packets used, number of parts dyed, and duration of time in the dye bath. Longer times and hotter temperatures will result in deeper color, but may warp the part if that plastic gets too hot. More parts dyed will pull more dye out of the dye bath, so you may need to increase duration if you’re dying a lot of very large pieces.
Additionally, it’s a good idea to make sure none of the parts touch the bottom of your container or any of the sides. This will transfer a lot of heat and will make any contacted elements much darker in color intensity. For the large blade sections, I drilled holes in areas that would be covered by panels later on, and set screws into them to act as stand offs. For the eye discs, I used small spring clips attached to wire to suspend the parts from the sides of the container during dying.

It’s a good idea to rinse the parts off in a cool water bath after pulling them out of the dye in order to prevent spotting color or warping.

One of the details not easily seen in game are the thinner circuit lines on the Transistor that illuminate when the sword speaks. To emulate this look, I had a set of decals trimmed out of translucent silver metallic vinyl at a local sign shop. My hope was that this would capture the lights from the LEDs without blocking them entirely and show up as glowy traces.

While the clear panels looked really neat, they wouldn’t capture the light of the LEDs very well. For good light transmission, parts should be more of a frosted finish than glossy. I taped off the perimeter of the blade sections and sprayed the interior with matte urethane clearcoat. This had the added benefit of sealing the vinyl decals in place to make sure they didn’t peel up in the future if the adhesive gave way.
An illumination check under a test frosted panel. I’m not brave enough to spray all the parts without knowing if my idea will work. Thankfully, it’s perfect!

The eyes received a similar finish, though I did change a few things to get the layered effect. The interior eye had a black gradient applied with an airbrush to the interior before matte clearcoat, while the outer eye was kept glossy with no gradient. I wanted this to look more like a lens while the inside part captured the illumination from the LEDs.

Another test!

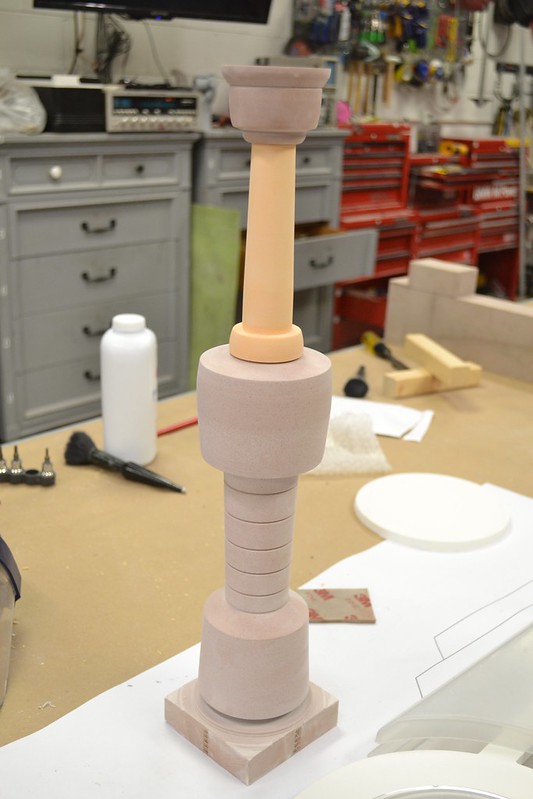
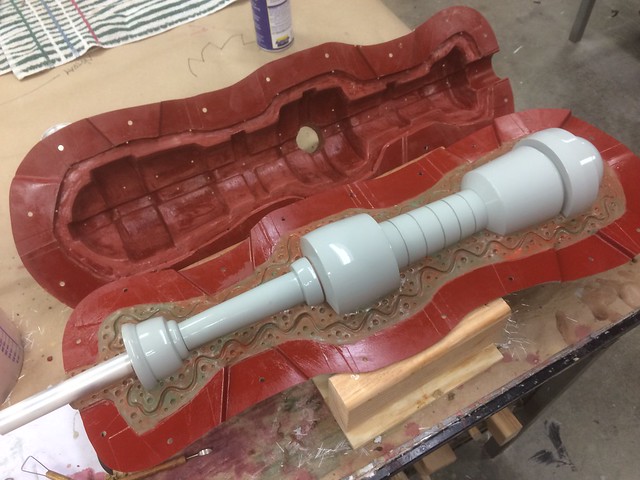
Time to talk about the opaque parts. The handle was more familiar territory, though completed in a slightly different fashion. I’m no stranger to turned parts, and I recently acquired a really amazing machine on which to create them. For the very large handle of the Transistor I turned down 31# and 25# urethane tooling board on my 1946 Sheldon machine lathe. This thing is a monster, and it ate through the foam like I’d put a marshmallow in the chuck.


After each piece was turned to shape, they were assembled around a steel bar and painted with acrylic Mipa primer. This was sanded smooth in prep for molding.

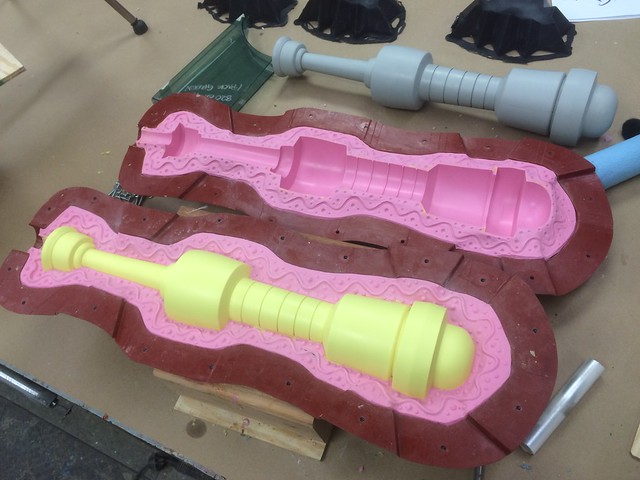
I’m starting to get much faster at matrix molding. Both because I’m getting more experience with the technique, but also because I made my assistant Steve do most of the clay work so I didn’t notice the abhorrent tedium inherent to the process. I’ve written about this several times in the past, so if you’re looking to learn more about matrix molding please check out this post right here.
Speaking of processes I’m becoming more familiar with, I picked up a CnC router from the guys over at Inventables back in April. This is my second foray into computer controlled cutting – the first being my woefully overworked Full Spectrum train wreck 45W hobby laser cutter – and the first time I’ve used something with a Z-axis. I’m planning on doing a video review of the machine soon, but for now I’ll just say it’s pretty freaking great.
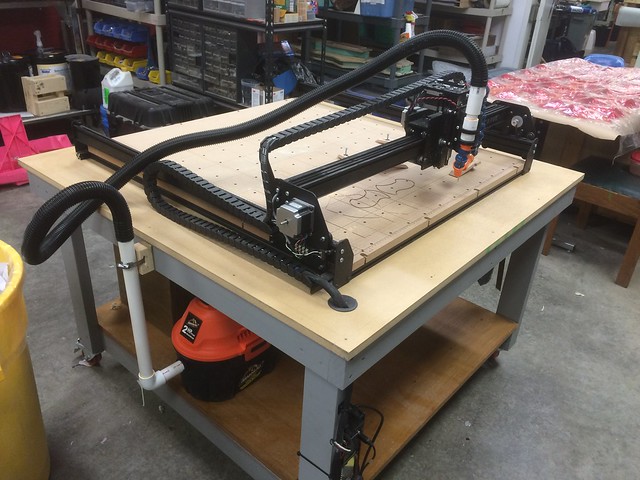
The 3D files provided by the guys at Supergiant Games worked out beautifully with my new CnC router. I was able to export components from Blender into MeshCAM, then send the tool paths to the machine with Universal GCode Sender. If that all sounds like gibberish, it did to me as well a few months ago. It’s a lot like learning a new language; the best way to figure it out is immersion.
The first parts to be trimmed were the small blade fins toward the base of the sword. Since a 3-axis CnC router can only trim 2.5D items, these were split in half to be joined together later on once the cutting was complete (technically there are ways to do two sided cuts, but this solution is much simpler to someone new at CnC milling)

The blade master was primed before sanding, polishing and molding. Both the blade and the handle parts were cast from Smooth-On SmoothCast 320. The molds themselves used Mold Max 30 tin cure silicone.

My X-Carve still had plenty of work left to do. There’s a large triangular cross guard on the sword, and I wanted this to be the place where all the electronics would live. That meant it needed to be hollow, so I used the CnC to carve out a large vacuum forming buck from 18# urethane foam. This was only rough cut; the broad flat geometry meant that sanding by hand would be faster than the machine time needed to clean up all the edges.

Here’s the same part after sanding and a heavy coat of filler primer. I sanded out all of the rough orangepeel before vacforming copies in styrene.


Much of the V shape in these two triangles would be cut away for the upper blade section, but the back of the parts needed to be assembled into one seamless piece

For this, I cut a center support out of 1/2″ thick PVC board. Each vacuum formed cross guard half would be glued around this central spine – the notch cut into it would center the cross guard on the blade, and the reinforced upper section would mate up to a steel bar inside the sword handle to make sure everything stayed on center.

I needed a way to get into the cross guard in order to to install and program the electronics. A set of neodymium magnets inset into a PVC lip makes a handy access panel! I also added a bit of reinforcement to the door itself to make sure the thin styrene didn’t flex.


Since the Transistor would need to speak and play sound effects, I inset a pair of speaker grilles into the broad flat top section of the crossguard. Having a laser cutter really makes fancy stuff like this much easier. These were sanded flush to blend into the rest of the shape after painting.
The last vacuum formed part on the list was the slight dome around the eye. Typically I’d turn a shape like this on my lathe but the diameter was too large for my machines. The X-Carve did a great job with some more 18# urethane board, and I had a set of copies ready to go, formed in .060″ styrene.


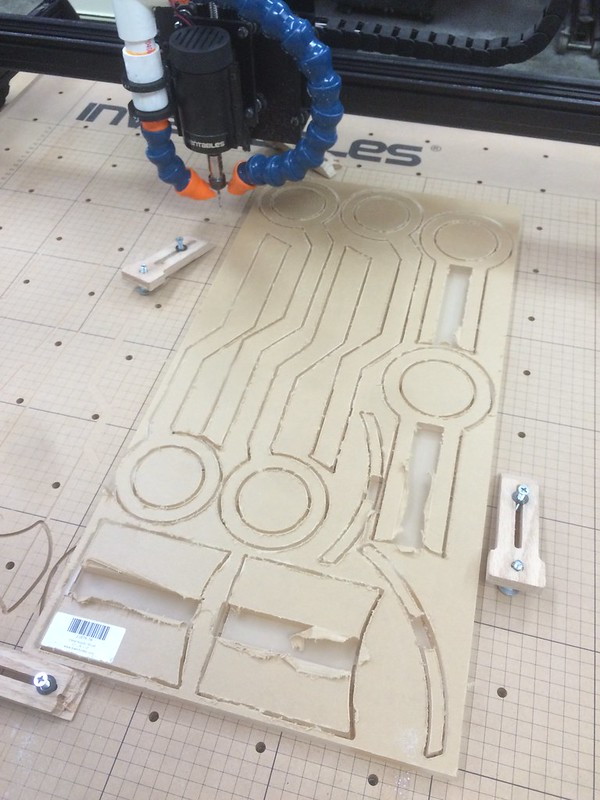
In the provided 3D render, the central circuit pattern is an extruded shape that passes through the clear segments of the sword blade. For the IRL version, there would be a middle structural section comprised of laminated 1/2″ layers, with a set of thinner 1/16″ panels sitting on top of the clear panels to give the illusion of a continuous part. I started off by setting up the X-Carve to trim out one set of these panels in 1/2″ PVC board.


I repeated this process for the thinner material to create the smaller raised accents.

To make sure light would transmit through these central sections and illuminate the entire blade, the center panel of this assembly was cut from 1/2″ acrylic sheet. This took nearly six hours on the CnC, since the acrylic has to be cut in .010″ passes.
Here’s a proof of theory with a flashlight. The idea works!

In one of the shots above, you can see a 1″ wide channel carved into the center panels. The sword was getting to be a rather large assembly of parts, and I knew it would need some structural reinforcement. This channel was to be the home of a 1″x.125″ steel bar, welded to a .375″ steel rod which would be embedded into the sword handle.

Okay so my welding isn’t going to win any awards.

All of that gets us to about this point (minus PETG dye baths.) Since this entry is massive, I’ll be splitting the build log into two parts. The second entry will cover painting, electronics and assembly!
As always, there are a ton more photos on my Flickr. Check that out if you’d like to see more info.

Thanks for reading!
All of the products listed in this write up are the products that I use and recommend. They are provided as Amazon affiliate links, which help support Volpin Props.